
Nobody wants to be that sales guy. You know, the one who always pops up at the exact wrong time,...
Just imagine if all leads were created equal, how simple would our marketing efforts be? Sadly, not every single lead is a quality one and as harsh as it sounds, there are going to be plenty of visitors that come across your website that just won’t be a good fit.
If anything, that’s a huge time killer and instead, the focus should be on handing over quality leads to your sales team. This is the important part, though. The best way sales teams can focus on the best leads possible is by lead scoring and it’s something every lead nurturing strategy needs. Here’s how you can set it up for yourself in HubSpot.

It’s simple. Lead scoring helps your team focus on high quality leads and saves a lot of valuable time which would be lost in chasing low quality leads.
When lead scoring is done right, you’ll be able to tell which leads need more marketing materials, if they’re ready to talk to a salesperson, if they should have made a purchase already and more - depending on the score they have been assigned. Click on the links below to be taken to the relevant section.
How to Set Up Lead Scoring in HubSpot
Step One: Navigate to Manual Score Leading
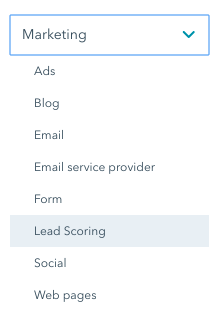
In your HubSpot account, click the settings icon (the cog) in the main navigation bar at the top right corner. Once the page has loaded, in the left sidebar menu, navigate to Marketing and then click on Lead Scoring. Alternatively, just hit the search button at the top and type "Manual Lead Scoring."
Step Two: Create Scoring Criteria
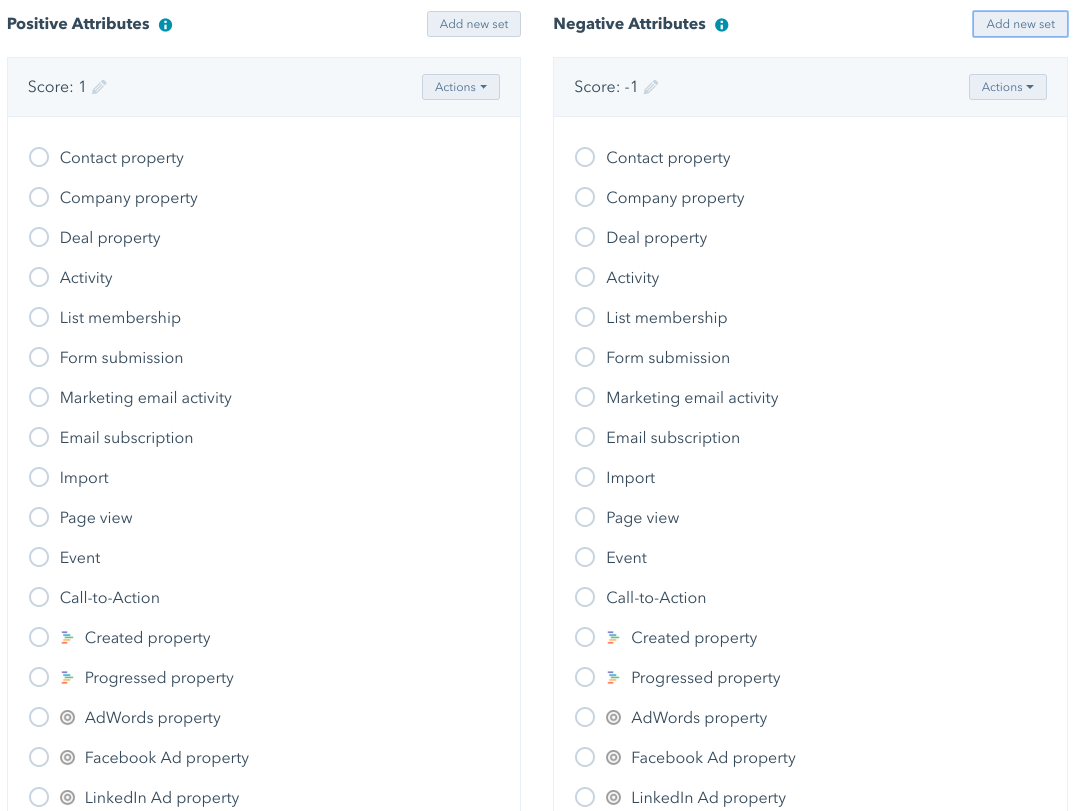
Once you’re at the Manual Lead Scoring page, it’s time to assign positive and negative scores or attributes to your contacts to create a HubSpot score for them. Here, you’ll want to consider the actions that users can take on your website that are important to your business.
Rather than diving into it right away, write some of them down beforehand. Assign scores to them and determine a point value threshold for qualifying your leads. Although, you can update your scoring criteria at any time and then HubSpot goes in and recalculates the scores for every single contact. Ideally, this should be done before your actual Inbound Marketing campaigns.
To add your very first score, click on ‘Add new set’ in the top-right corner of your Positive Attributes or Negative Attribute sections.
Negative scores are important. It’s easy to get excited about giving plenty of points away, but negative scores give you and your team a much better idea of when a once-hot lead begins to cool down and won’t be of much value. If they’ve downloaded some content and checked out blogs regularly one day before unsubscribing from emails the next and marking you as spam - then it’s not a good lead.
Each lead scoring rule you set will either get a positive or negative point value. When the criteria is met by a contact, they are given the number of points you set for the action. Check out our example below.
As an example, we've decided to give a score of three to a user that has clicked on a particular CTA.
-1.gif?width=600&name=ezgif_com-crop%20(1)-1.gif)
That’s just an example. The criteria you set up is dependant on your company, so that could very well be ‘Twitter clicks are greater than five,’ for example. Following this, click ‘Add new set’ and repeat this step for other types of clicks. Another example we've decided to throw in is to give a score of 20 if the contact property is equal to a particular persona.

You can set lead scores for other actions, such as email clicks while a lead filling out a contact form might score them three, depending on the score you’ve given to each action.
It might also be beneficial to give different scores for similar criteria. For example, you might score leads differently depending on their company’s annual revenue. An annual revenue of £1 million might see you give them a score of five, while you might set £10 million a score of 15.
On the other side of things, you can add sets to your list of Negative Attributes to deduct points from your contacts. This is where they take actions which suggest they aren’t too engaged with your business so probably aren’t worth chasing up. As you can see below, you can set a score of -5 if they’ve opted out of all of your emails.
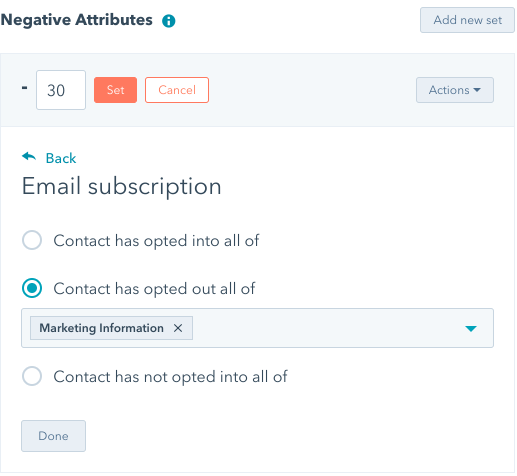
Let’s face it, if they’re opting out of your emails and getting a negative score, they’re probably not the leads you need to focus on.
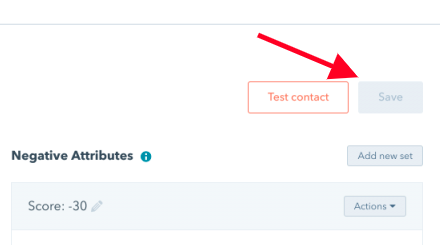
Step Three: Save Your Changes
It can take a while to make the changes you want, so it’s important to actually save them and not let that work go to waste. When you’re ready to score your contacts database, press save at top right corner.
This is usually a quick process. However, if you have a large contact database then it can take some time for them all to be scored. If you want to jump back in and make changes to your scores or change the rules, then hit save again so that your contact database can be re-scored.
Step Four: Test Contacts Against Your Criteria
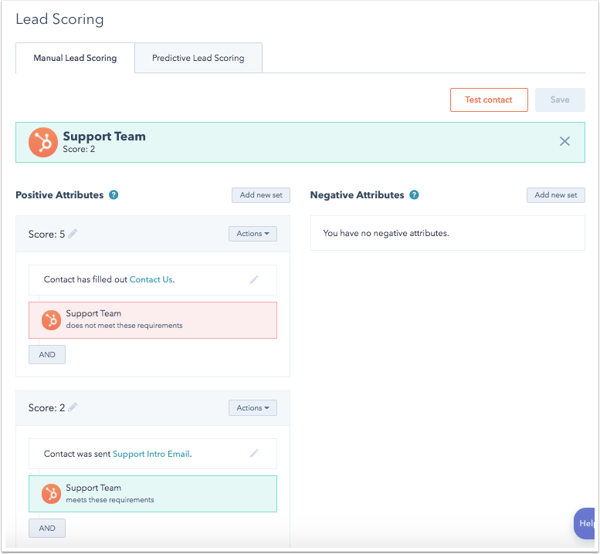
While it’s not compulsory, testing the criteria against a known contact in your HubSpot database is a good step to take. To do this, click ‘Test contact’ at the top right-hand side.
Once you see a pop-up, you can search for contacts and then click on the radio button next to the contacts and select one by pressing test. From there, you’ll see exactly where your chosen contact does meet the requirements of the lead scoring rules you set and where they fall short.
As you can see below, HubSpot’s test user meets one requirement that has been set yet fails in another.
Step Five: Create Smart Lists of Automatically Qualified Leads
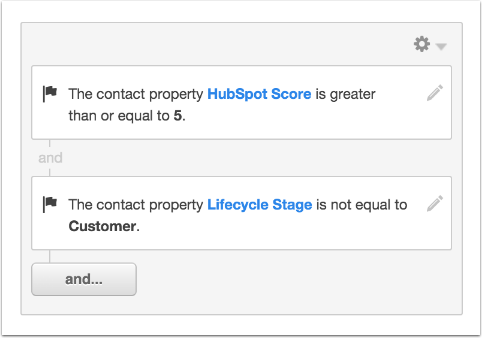
Once you have set all of your scoring criteria within your contact database, HubSpot lets you create a smart list to help you keep track of contacts that have a score greater than or equal to the goal score you initially set. If you set five as your score, then every contact within your database with a score of five or more will be added to this list.
To create a smart list, navigate to Contacts. Then, hover of lists and click on New List. As you’ll see below, you’ll need to choose Contact property and then select HubSpot Score from the dropdown menu. Next, click on the button next to ‘is greater than or equal to’ and type in your score before clicking done.
You can continue building this list if you wish, so every contact with the relevant score will automatically be added into the list. Once you’ve finished building your list, then your list criteria should look like the following:
An Alternative Method
Everything we mentioned above was how you can lead score manually. However, if you dive into the Enterprise tier of HubSpot - the highest tier available - then you can start using the predictive lead scoring tool.
This is a tool that uses an algorithm to predict which contacts in your database are qualified or not qualified. When predicting your score, several factors are taken into consideration. Some of these include information filled out on your website, behavioural data, social information, demographics and more.
By doing this, you don’t need to figure out exactly which properties should be included. Instead, the algorithm looks at the information your customers have in common as well as information of your lead that didn’t close have in common. From there, the algorithm then comes up with a formula that automatically lets you identify the most qualified leads.
The Benefits of Lead Scoring
- You lose fewer opportunities: A study from Gartner has shown that 70 percent of leads are lost from poor follow-up. With plenty of leads to analyse, it can be difficult to determine which ones are the most qualified. With lead scoring, you can rank marketing qualified leads (MQLs) or sales qualified leads (SQLs) so the most valuable leads stand out.
- Waste less time: When you lead score, you can prioritise leads to save valuable time. This is because you instantly know where leads are in your sales funnel and your teams can get to work right away. Sales teams can begin working on those red-hot leads while marketing teams can leverage marketing automation to nurture warmer leads.
- Better sales productivity = a happier sales team: When your sales team has a smaller pool of qualified leads, they can speed up the sales process by not wasting valuable time on poor leads. By using that time on the most relevant leads and closing sales, they’ll be much happier.
- Data-driven eliminates assumptions: Lead scoring is all data-driven. This means you’re eliminating the guesswork when it comes to finding out who your most qualified leads are and you can focus on the ones you need to.
- Higher Lead ROI: Less time spent and better quality leads suggests that you can get a high return on time invested. Marketing Sherpa’s study showed those using lead scoring had a 77 percent increase in lead generation ROI compared to those not using lead scoring.
Lead Scoring Tips
Criteria
Having the demographic information about your leads is crucial. For example, you might be scoring things like the company size, company revenue, location, company size and more. However, it’s also beneficial to analyse behaviour.
Analysing and scoring behaviours lets you learn about prospects as they navigate through your website and engage with you through social channels and emails. Ways in which you can lead score based on behaviour include:
- Lead score on page views
- Lead score based on specific pages viewed
- Lead score based on the number of visits
- Lead score based on email engagement
- Lead score on social media behaviour
Don’t Ignore Negative Scoring
Negative scoring is just as important as positive scoring. As we highlighted above, it’s important you know when valuable leads become less and less relevant to your business. While positive lead scoring will give a high score, it’s the negative lead scoring which provides much more accurate data as you’re covering both bases. So, don’t hesitate to score contacts negatively.
Set Smart Scoring Ranges
One big mistake to avoid is to throw out random scores to criteria. Don’t award a score of three for one set of criteria and then 15 for another. It’s important to stay smart and set ranges because it can help the rest of your team see exactly which stage the leads are in.
For example, you might set a scoring benchmark of 60, which might show that contacts with scores of 60 should be the ones your sales team sells to immediately. A benchmark of 50 might be the contacts where you’re researching what you can do to tip them over the edge to turn them into a lead while a benchmark of 40 might be contacts that are just about on your radar right now and ones you’ll need to turn your attention to soon.
Without smart scoring ranges, your contact list could be all over the place with varying numbers. By having random scores, it can be more challenging to see who really are your most qualified leads.
Find Out More About The World of Inbound Marketing
Lead scoring in a lead nurturing strategy is just one of the many aspects that’s involved in boosting your Inbound Marketing efforts. As you can imagine, there’s a lot more to pack in and there’s just not enough space here to throw all of that useful information at you to soak in.
That’s why we’ve created an easy-to-read and understand guide. Take a read: